

Troubleshooting Audi AC Compressor Noise and Cabin Vibration
How to Track Down Audi AC Compressor Noise
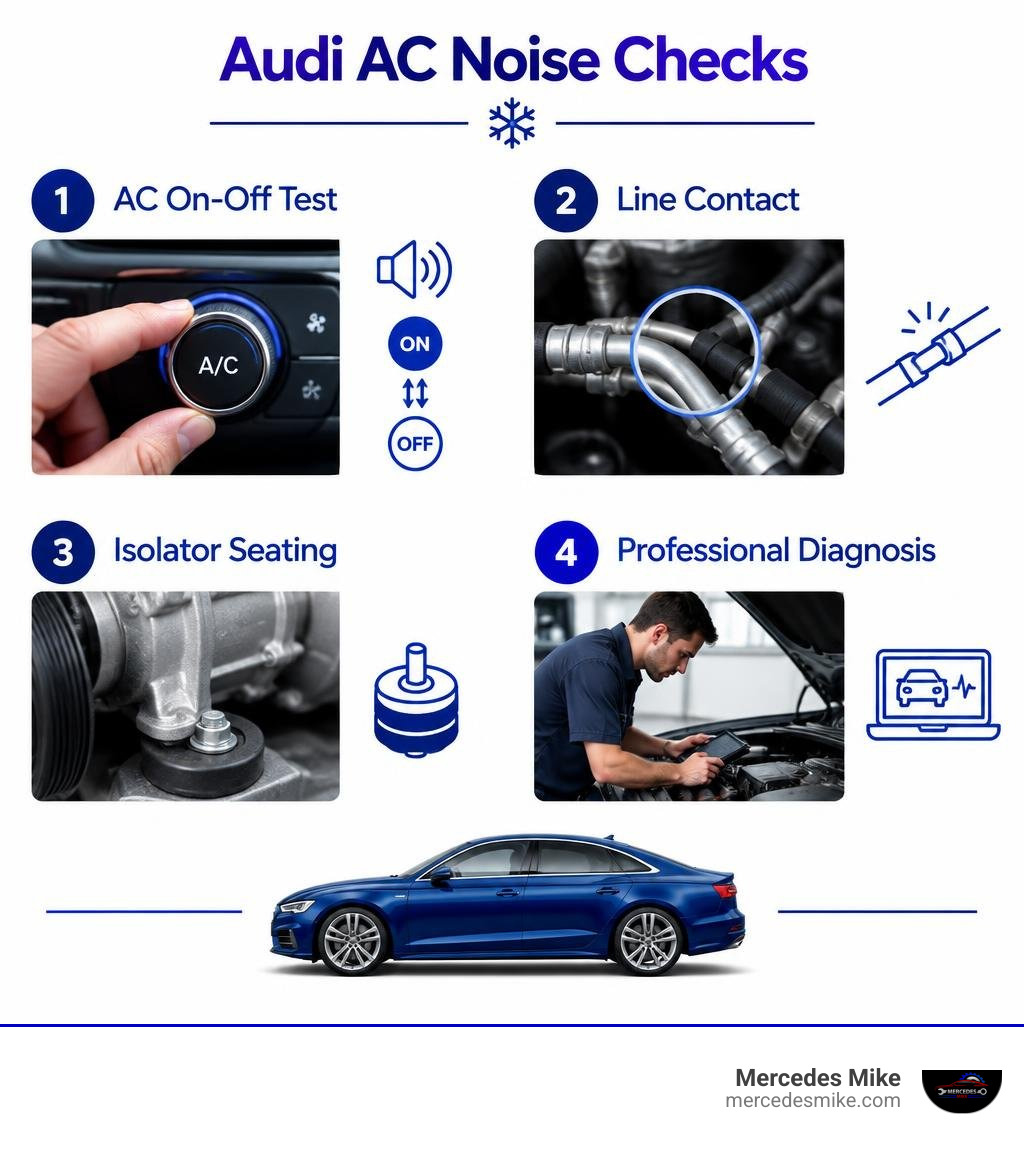
Start by checking when the noise happens. With the car parked, turn the A/C off and on. If a buzz, rattle, or whine follows the A/C, switch the vehicle off before looking under the hood. Check whether refrigerant lines touch each other or the hood-release cable clip. Some Audis also develop noise from a poorly seated compressor isolator or vibration in a refrigerant line.
Don't replace the compressor based on noise alone. Grinding, weak cooling, or a noise that persists with the A/C off calls for a professional diagnosis. Never open a refrigerant line yourself; the system is pressurized.
I'm Mike Ibrahim, and I'll show you how to narrow down the cause of an audi ac compressor noise before choosing a repair.
Common Causes of Audi AC Compressor Noise Across Models
When dealing with cabin rattles, buzzing, or whines in a luxury vehicle, our first instinct might be to assume a catastrophic internal failure. However, an audi ac compressor noise complaint often stems from harmonics rather than damaged internals. Modern Audi climate control systems use variable-displacement compressors that continuously adjust refrigerant flow, creating microscopic pressure pulses through the aluminum lines.

Identifying Mechanical vs Acoustic Audi AC Compressor Noise
Understanding the fundamental difference between mechanical breakdown and acoustic resonance saves thousands of dollars in unneeded parts.
Mechanical Failure: A failing compressor clutch bearing, worn internal swash plate, or scored pistons produce loud, metallic grinding, screeching, or harsh rattling sounds. These mechanical failures are accompanied by poor cooling performance, metal debris in the refrigerant circuit, or a seized drive belt. If you are experiencing a pronounced rattle, you can explore why your car's A/C makes a rattling noise to see standard mechanical symptoms.
Acoustic Resonance and Flutter: The compressor is operating perfectly, but natural pressure pulses travel through the refrigerant lines. If these lines touch the chassis, cross other metal lines, or vibrate at specific engine speeds, they transmit a high-pitched whine or buzz directly into the cabin dashboard.
Model Platform | Engine / Drivetrain | Common RPM / Operating Conditions | Noise Characteristics | Typical Root Cause |
|---|---|---|---|---|
Audi e-tron / Sportback (2019–2022) | Dual Motor Electric | A/C active during low cabin noise / driving | Buzzing, rattling from front bulkhead | Refrigerant line contact; Bowden cable clip rubbing; isolator spring misaligned |
Audi RS 3 (2017–2020, 2022–2023) | 2.5L TFSI 5-Cylinder | 1,500 – 2,000 RPM under light acceleration | High-frequency dashboard & rear vent whine | Line harmonic resonance; lack of low-side balance damper |
Audi A6 / A7 (2012–2015) | 2.0L / 3.0L Gas Engines | A/C set to 'Low', blower fan ≤ 2, radio off | Faint, high-pitched acoustic whine | Suction line acoustic pulsation; low-side dampening required |
Audi S6 / S7 (2013–2018) | 4.0T V8 Twin-Turbo | Low blower settings, idle to 1,800 RPM | Subtle tonal cabin whine | Refrigerant line harmonic transfer across firewall |
Affected Models: e-tron, RS 3, and A6/A7 Platforms
Acoustic vibrations show up uniquely across various chassis:
Audi e-tron quattro (2019–2022) & e-tron Sportback quattro (2020–2022): Because electric vehicles lack an internal combustion engine to mask minor sounds, any compressor flutter becomes immediately noticeable. Direct contact between adjacent lines or between a line and the front hood-release Bowden cable clip easily radiates into the passenger compartment.
Audi RS 3 (2017–2020, 2022–2023): The iconic 2.5-liter 5-cylinder engine revs freely, but between 1,500 and 2,000 RPM, specific engine load frequencies match the refrigerant cycle, sending a high-frequency buzz audible from the instrument panel and rear center console vents.
Audi A6 and A7 (2012–2015): Models equipped with 2.0L and 3.0L gasoline engines frequently exhibit a subtle whine heard best when the blower fan speed is dialed down to 1 or 2 with the audio system off.
Audi Q5 and Q7 SUVs: If you own an SUV platform encountering cooling dropouts alongside vibration, reviewing targeted Audi Q5 AC repair procedures helps separate line vibration from thermal expansion valve restrictions.
Step-by-Step Diagnostic Procedures for Audi HVAC Noise
Before unbolting parts or recovering refrigerant, perform a systematic diagnostic check.
Step 1: Isolating Cabin Whine Under Specific HVAC Settings
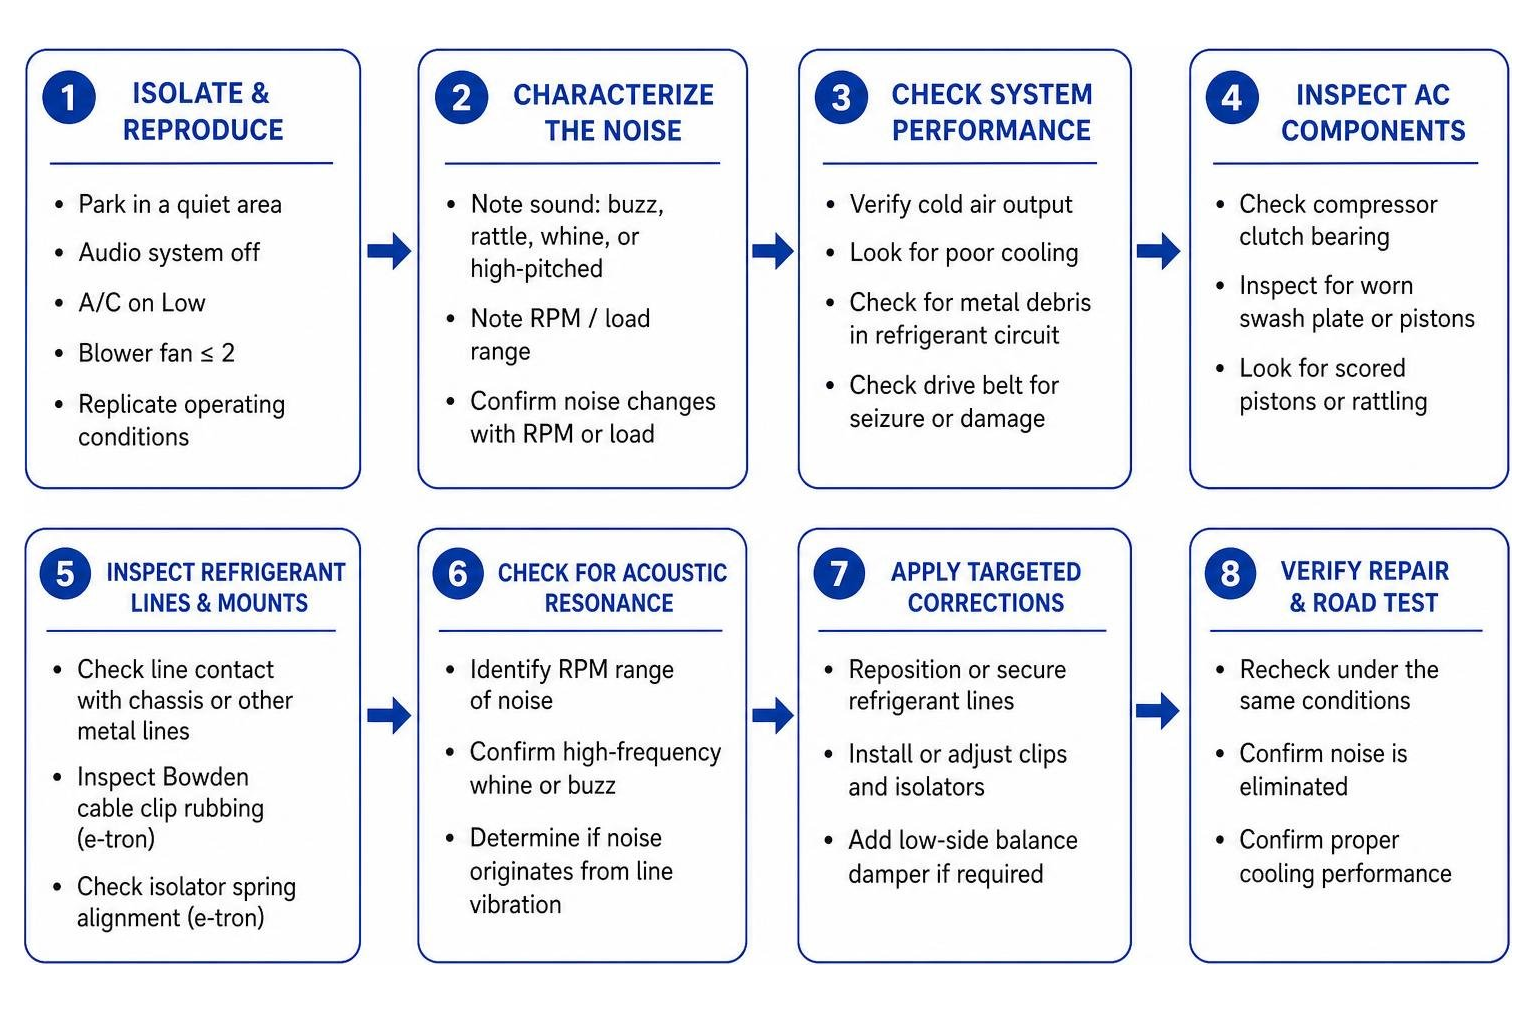
To confirm whether your noise matches known factory technical bulletins, you must isolate ambient noise and duplicate exact operating parameters:
Park the vehicle in a quiet staging bay and turn off the audio system.
Set the climate control temperature to Low on both driver and passenger zones.
Turn the blower fan down to speed 1 or 2.
Switch the A/C button (compressor engagement) on and off.
Listen closely to the center dashboard, instrument cluster, and rear ventilation outlets. If a faint, high-frequency whine appears only when the compressor is active and disappears instantly when switched off, you are dealing with acoustic circuit pulsation rather than a mechanical bearing failure, as documented in this Technical Service Bulletin.
Step 2: Inspecting Refrigerant Line Contact and Bowden Cable Interference
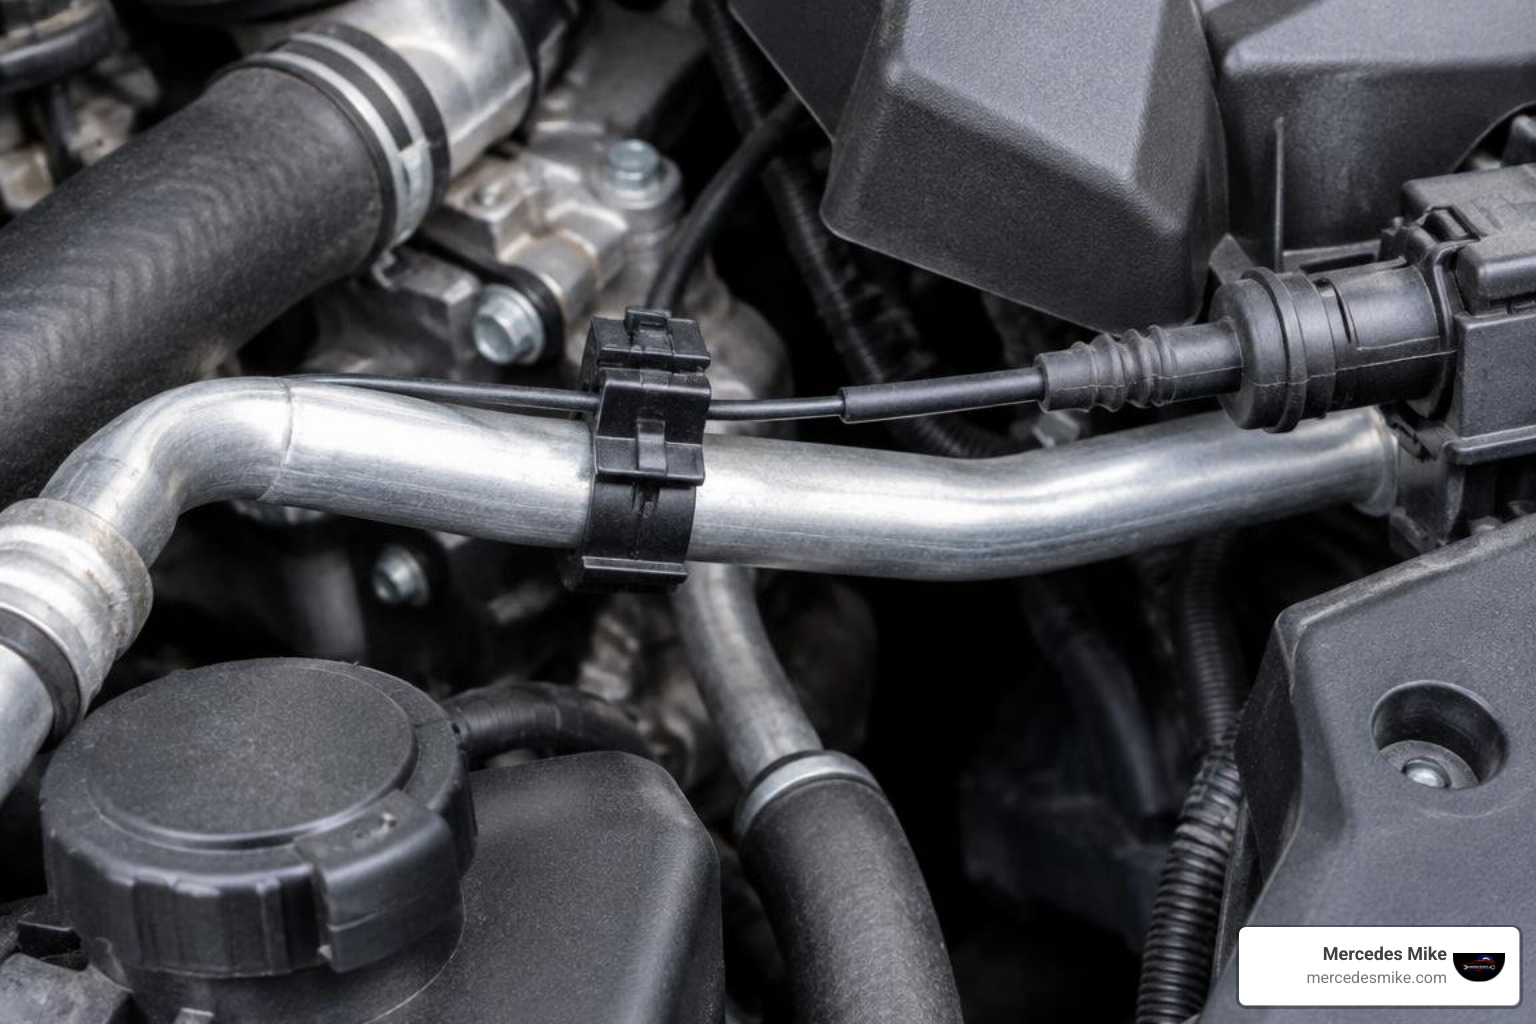
Pop the hood and examine the clearance around the aluminum and flexible rubber refrigerant lines running along the front bulkhead, wheel arches, and motor mounts:
Check Line-to-Line Clearance: Look for spots where the coaxial suction and discharge lines cross each other or sit within a millimeter of adjacent metal piping. Over time, engine movement causes these lines to buzz against each other.
Check the Hood Release Bowden Cable: Follow the hood release cable along the front fender and lock carrier. Audi found that the plastic retention clip holding the Bowden cable frequently rests directly against the low-pressure refrigerant line, acting as a direct physical bridge that transmits compressor pulsing straight into the vehicle body.
Touch Test: With an assistant cycling the A/C, gently place a gloved hand on the suspected line (avoiding engine belts and cooling fans). If damping the line with your hand silences the cabin rattle, you have pinned down the contact point.
Step 3: Checking Compressor Isolator Springs and Mounting Bushings
On vehicles like the Audi e-tron and high-performance sedans, the compressor sits on isolated mounts equipped with damping springs and rubber bushings to buffer high-voltage or belt-driven operation.
Isolator Spring Indexing: Inspect the isolator and spring assembly on the compressor mounting bracket. If the spring was improperly indexed in its rubber mount during factory assembly or a previous service, the isolator will sit cocked rather than resting flat against the mounting bracket.
Centering Sleeves: On internal combustion models, ensure the compressor mounting bolt centering sleeves are present and seated. Missing sleeves allow the compressor bracket to twist under load, as detailed in the official Production Solution.
Factory TSB Repair Procedures and Vibration Damping
Once you identify the acoustic source, Audi’s factory Technical Service Bulletins provide permanent, non-invasive solutions that eliminate the noise without replacing an otherwise healthy compressor.
Resolving Resonant Whine with Low-Side Balance Weights
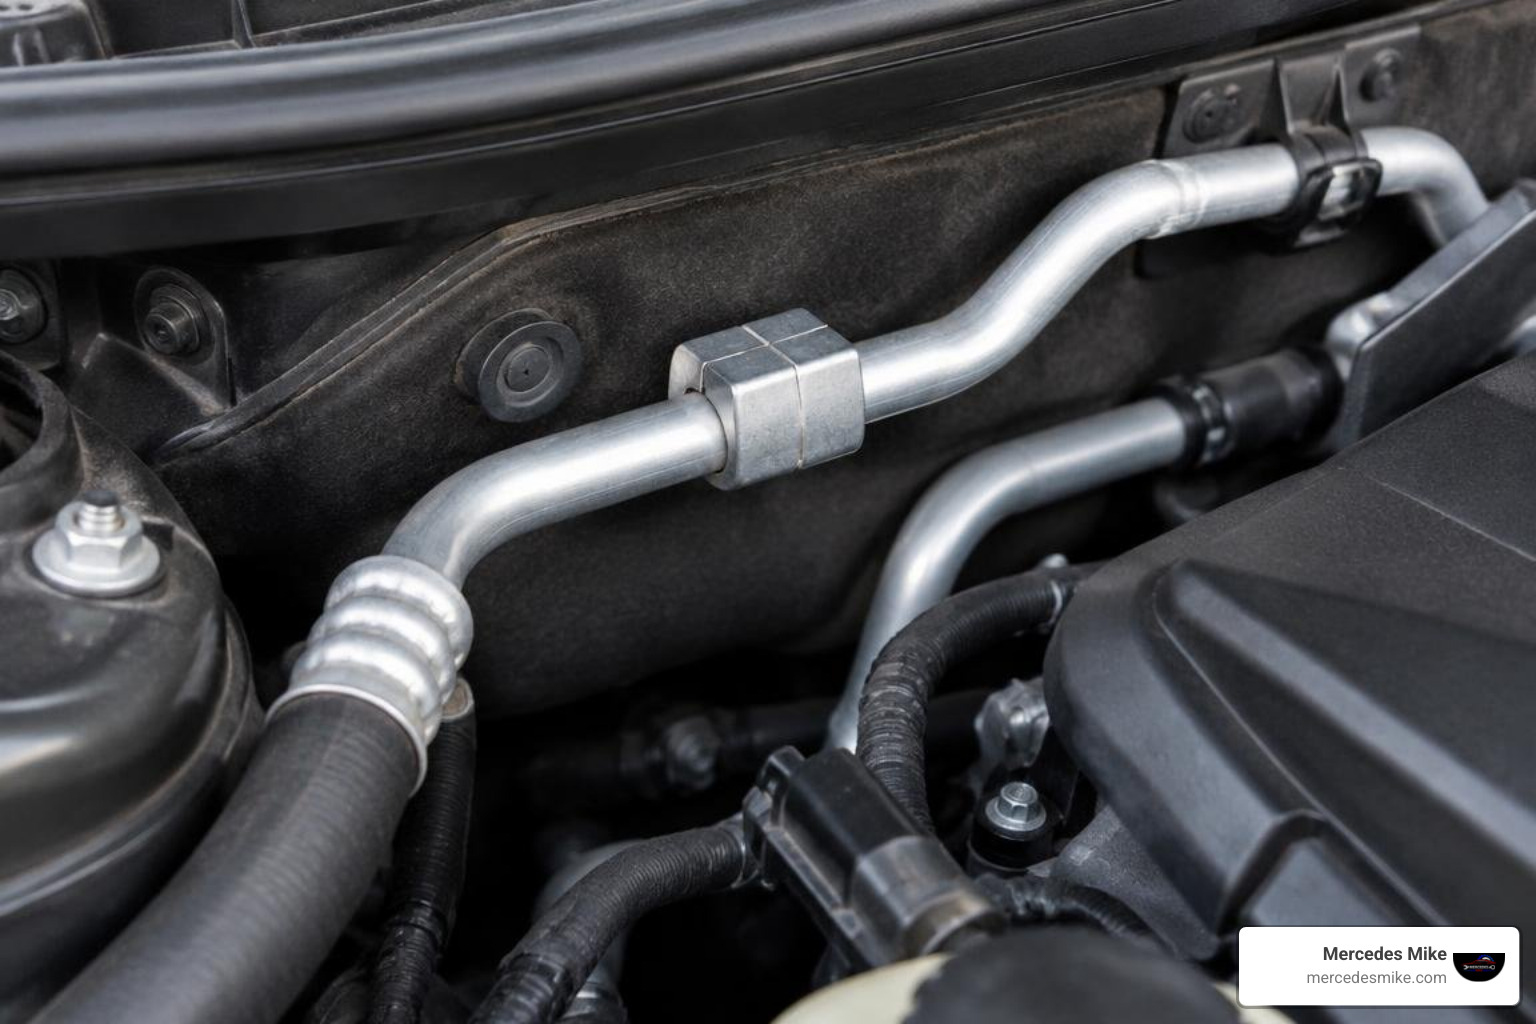
For resonant whines occurring at specific engine RPMs (such as 1,500–2,000 RPM in the RS 3 or low fan speeds in the A6/A7), adding mass dampening alters the resonant frequency of the line, stopping vibration before it reaches the dashboard.
Obtain the Correct Balance Weight:
Part #4G0513621A (used with bolts N 10653601) for A6/A7 platforms.
Part #5Q0820899 (used with bolts WHT 003 121) for RS 3 and transverse platforms, as specified in Audi's Technical Service Bulletin.
Mounting Location: Position the dual-piece damper weight over the specified straight run of the low-side (suction) aluminum line near the firewall bracket.
Torque and Chemical Lock: Apply medium-strength thread-locking compound (D185410A2) to the securing bolts and torque evenly to 13 Nm (± 3 Nm). Do not over-tighten, which could crush or deform the thin-walled aluminum pipe.
Separating and Securing Contacting Refrigerant Lines
For e-tron and crossover models suffering from line-contact buzz, follow the guidelines outlined in this Technical Service Bulletin:
Unhook Bowden Cable Clips: Release the front hood cable clip from resting against the low-pressure line. Reposition the clip or install an OEM spacer sleeve to maintain at least 10–15 mm of clearance.
Install Hose Separators: Where coaxial lines run parallel, clip OEM hose holders or heavy-duty automotive isolator clips between the pipes to isolate vibration transfer.
Clearance Service Ports: Ensure the service port mounting block is not resting against the structural fender well or bracket hardware.
Flushing Refrigerant Circuit and Recharging Oil
In older A6 and A7 models where line resonance persists despite mass dampening, factory repair procedures call for a specialized circuit refresh:
Evacuate and Flush: Recover the R134a or R1234yf refrigerant and perform a closed-loop flush using an approved recovery station.
Oil Balancing: Remove the compressor, drain the aged lubricant, and recharge the system with precise measurements of fresh Denso PAG oil (G 052300A2).
Line Replacement: Replace the low-side suction line with the updated superseded part number and install brand-new HNBR green O-rings lubricated with clean PAG oil before pulling a 30-minute vacuum and completing a precise German auto AC recharge.
Audi Warranty Details, Repair Costs, and Prevention
Audi TSB Warranty Coverage and Labor Operation Codes
If your vehicle is still within its factory warranty period (typically 48 months or 50,000 miles), these acoustic TSB remedies are covered when handled through certified channels. Repair bulletins reference standard billing information:
Service Number: 8744 (Refrigerant Lines / Air Conditioning)
Damage Code: 0020 (Vibration / Noise / Line Interference)
Labor Allowance: 20 TU (Technical Units) for line separation and clip adjustment; up to 60–160 TU when line evacuation, compressor unbolting, and flushing are necessary, as outlined in this Technical Service Bulletin.
Repair Cost Breakdown and Post-Repair Maintenance
When out-of-warranty repairs are needed, simple line isolation is much more affordable than replacing major components:
Clip Adjustments & Line Isolation: $120 – $250 (primarily diagnostic labor).
Balance Weight Installation: $180 – $350 (includes OEM dampener bracket and labor).
Complete Circuit Flush, Suction Line Replacement & Recharge: $650 – $1,200.
Full Mechanical Compressor Replacement: $1,400 – $2,600+ (necessary only if internal mechanical failure occurred).
To see how these price points compare across different luxury models, consult our comprehensive AC repair cost guide 2026 and the complete car AC repair cost guide 2026.
Preventative Measures: Whenever your vehicle undergoes unrelated engine or suspension work, remind your technician to verify line clearances around the lock carrier and ensure that compressor mounting centering sleeves are reinstalled properly.
Frequently Asked Questions About Audi AC Compressor Noise
Why does Audi AC compressor noise occur without a mechanical defect?
Variable-displacement compressors create natural pressure pulses as internal swash plates adjust stroke volume. When these frequencies match the natural harmonic resonance of long aluminum refrigerant pipes—or when pipes touch nearby components—the vibration transfers into the vehicle cabin as an acoustic whine, even though all mechanical parts are working properly.
How do I know if an Audi AC compressor noise requires compressor replacement?
A failing compressor produces distinct mechanical symptoms: metallic grinding or clattering that gets progressively louder, loss of cooling output, or a seized drive pulley. Furthermore, a technician will find grey fluid discoloration or metal shavings in the orifice tube and suction screen. A steady, faint whine at low blower speeds without cooling loss is almost always an acoustic issue rather than a broken compressor.
What tools are needed to install an Audi AC line balance weight?
Installing an OEM line balance damper requires a calibrated 1/4-inch drive torque wrench capable of accurately measuring 13 Nm, a clean shop rag, medium-strength blue thread-locking compound (D185410A2 or equivalent), and the correct OEM balance weight assembly.
Conclusion: Restoring Quiet Performance to Your Audi AC System
An unexpected buzz or whine from your dashboard can take away from the refined driving experience of your Audi, but you don't need to guess—or spend thousands on unnecessary parts. By methodically isolating cabin harmonics, checking engine bay clearances, and applying proven factory damping solutions, you can restore serene, quiet performance to your cabin.
If you are located in South Florida, visit our team at Mercedes Mike (882 NE 41st Court, off N Dixie Hwy, serving Pompano Beach and Deerfield Beach, FL). Our technicians utilize the latest factory tools and decades of specialized German automotive experience to diagnose your HVAC system accurately. To learn more about component pricing and repair options, explore our complete guide on the cost to fix an AC compressor or schedule an inspection with our team today.