How to Fix Car AC Condenser Cost Options in 3 Easy Steps
Understanding AC Condenser Function, Symptoms, and Failure Modes
To fix a car air conditioner condenser, first pinpoint the leak with UV dye, an electronic sniffer, or a soapy water test. For an isolated face-tube puncture, clean and abrade the aluminum, then apply a high-temperature epoxy patch and allow a full 24-hour cure. For split header tanks, corroded fins, damaged threads, or internal blockages, replace the condenser, install fresh HNBR O-rings, pull a deep vacuum for 45–60 minutes, and recharge by the factory weight specification.
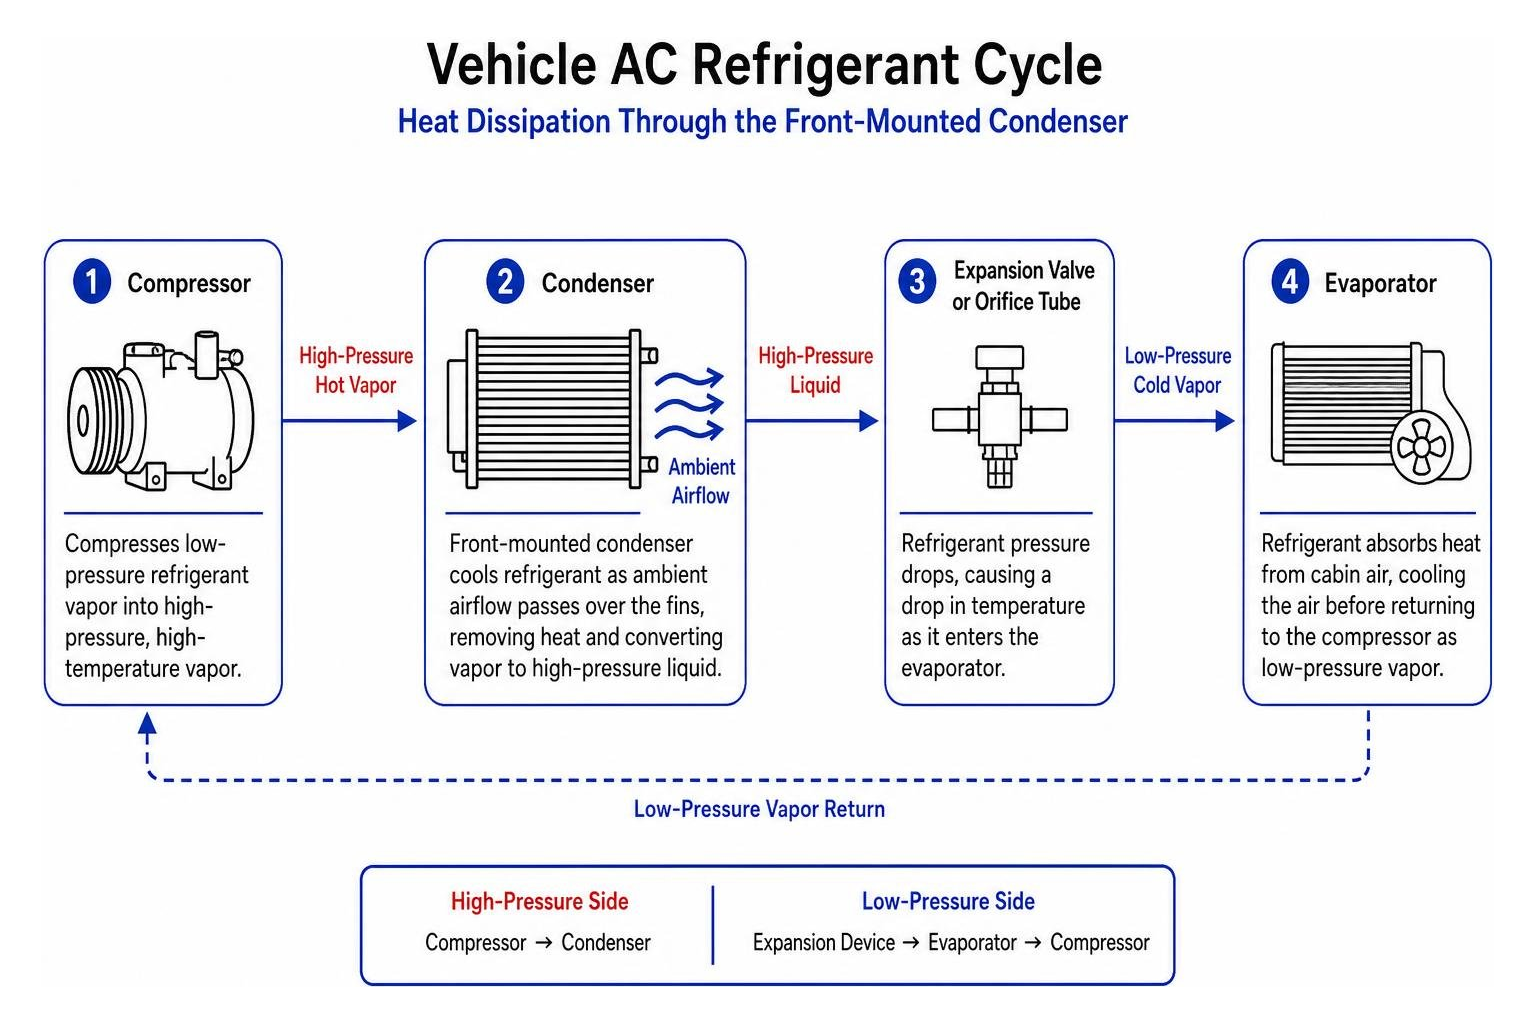
The air conditioning condenser serves as the primary heat exchanger for your vehicle's climate control system. Positioned directly in front of the engine radiator, its job is to receive superheated, high-pressure refrigerant vapor pushed out by the compressor and cool it down into a high-pressure liquid state.
As you drive, ambient airflow passes over a dense network of thin aluminum tubes and cooling fins, pulling heat out of the circulating refrigerant. When this process works seamlessly, liquid refrigerant travels smoothly to the expansion valve or orifice tube, creating ice-cold air inside your cabin.
Because of its forward position behind the grille, the condenser takes the brunt of highway debris, gravel strikes, salt exposure, and bugs. When damage occurs, several distinct symptoms appear:
Warm Cabin Air: The most immediate sign. If the condenser loses refrigerant or cannot shed heat due to bent fins, cabin air blows lukewarm or warm.
Visible Refrigerant Leaks and Oily Residue: Refrigerant evaporates into gas at atmospheric pressure, but the compressor lubricant (PAG or POE oil) stays behind. Dark, greasy dirt patches on the aluminum fins or around line fittings signal an active leak requiring professional refrigerant leak repair.
Hissing Noises: A significant crack or blown seal allows high-pressure gas to escape with an audible hiss under the hood.
Airflow Restriction and Engine Overheating: When road grime, leaves, and bent fins severely choke the condenser core, airflow to the engine radiator behind it drops drastically. This can cause engine coolant temperatures to spike, particularly when idling in traffic.
Excessive Compressor Cycling and Strain: Low system pressure causes the compressor clutch to short-cycle rapidly or fail to engage altogether. Running a leaking system starves the compressor of vital lubrication, accelerating mechanical wear.
Comprehensive Guide to Car Air Conditioner Condenser Repair in 3 Steps
Handling an automotive AC system demands the right tools and strict adherence to environmental safety protocols. Under federal law (EPA Section 609), venting refrigerants directly into the open atmosphere is illegal. Before cracking open any line, the refrigerant charge must be recovered using a dedicated recovery machine.
For a safe repair, assemble the proper equipment:
High-pressure manifold gauge set
Two-stage rotary vane vacuum pump (rated for at least 3 CFM)
Backup wrenches and metric socket sets
Replacement HNBR O-rings and clean PAG/POE oil
UV leak detection flashlight and yellow glasses
Heavy-duty nitrile gloves and ANSI-approved safety goggles to protect against frostbite and chemical exposure
Step 1: Pinpoint the Leak and Assess Condenser Damage
Before removing components, pinpoint the exact source of your system's pressure loss.
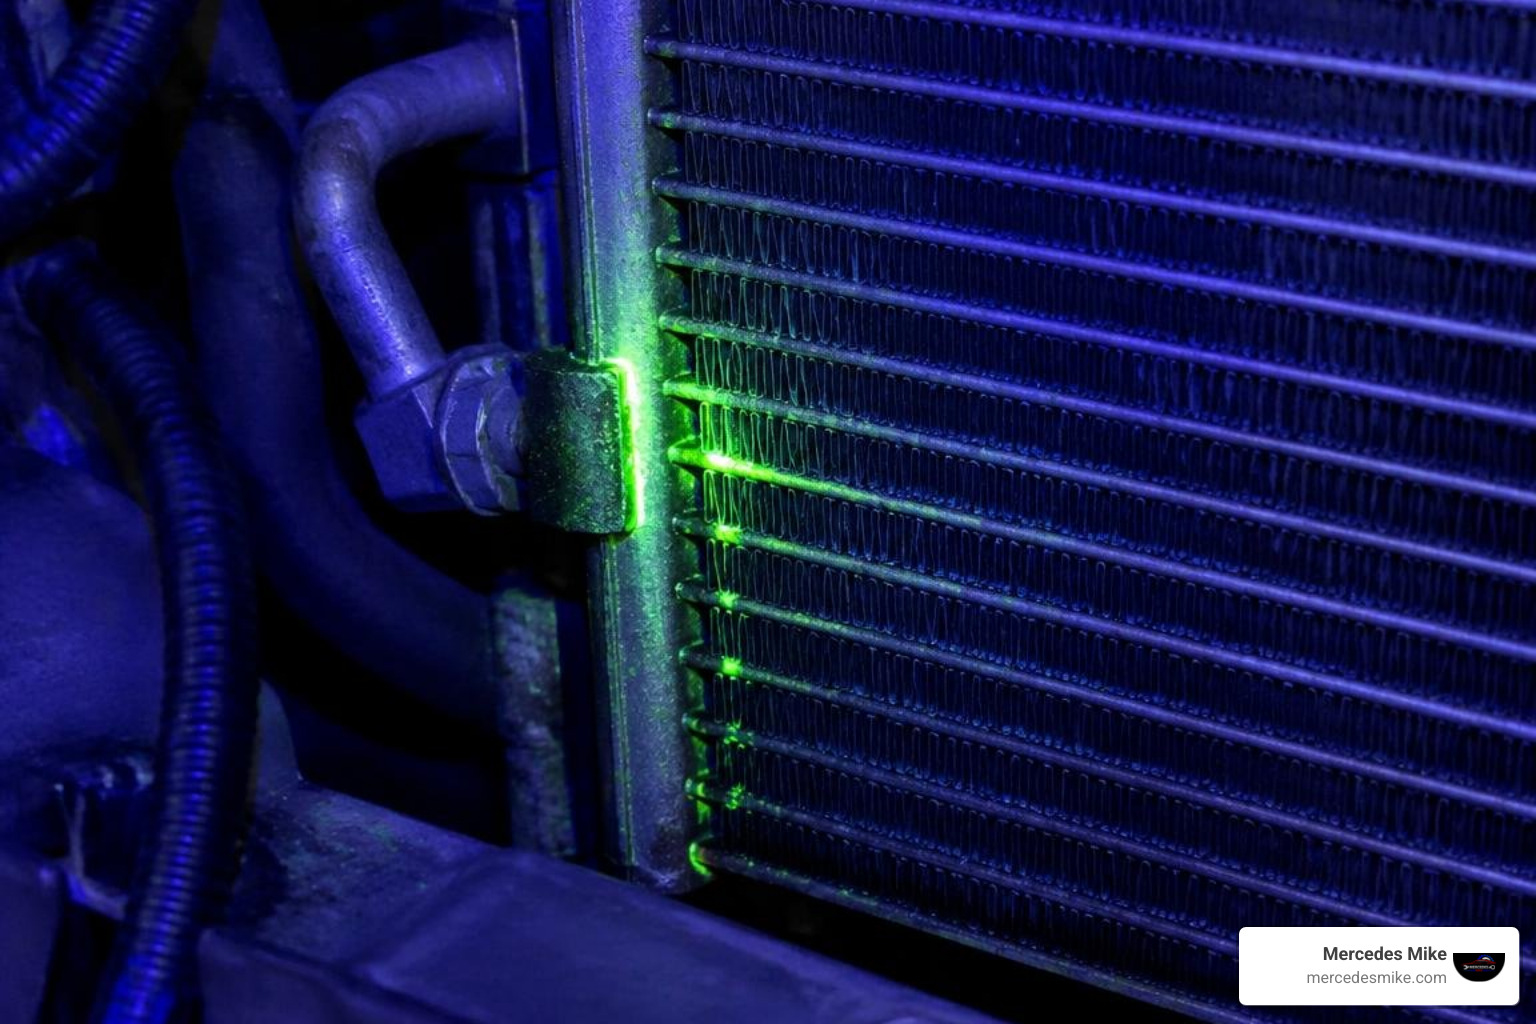
UV Dye Inspection: Most modern AC systems contain fluorescent yellow-green UV dye. Darken your workspace and sweep a UV inspection light across the entire face of the condenser, paying close attention to lower corners, tube-to-header joints, and line connections. Any bright neon glow pinpoints a puncture.
Electronic Sniffers: For microscopic leaks where dye hasn't pooled externally, run an electronic halogen sniffer along the cooling fins. The device sounds an audible alarm when detecting parts-per-million levels of escaping gas.
Soapy Water Bubble Test: If the system retains residual static pressure, spray a mild soap solution over suspected tube damage and check for growing bubbles.
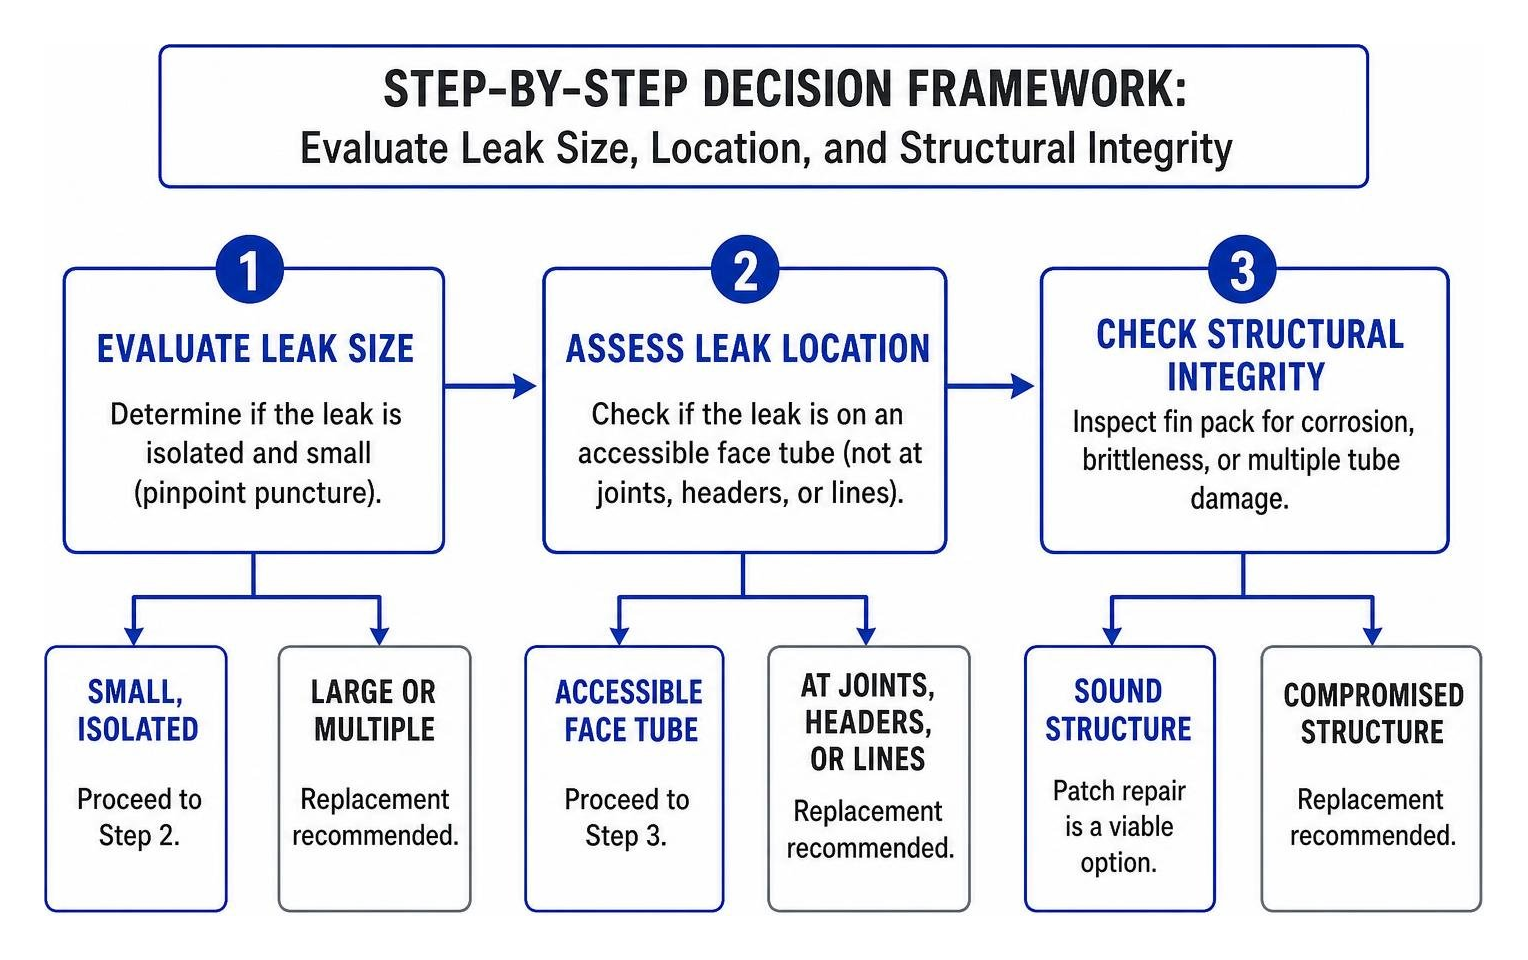
Assessing Structural Damage: Inspect the fin pack. If corrosion has turned the aluminum chalky and brittle, or if rock punctures have severed multiple tubes, an external patch will not hold long-term. In those cases, consult a practical guide to replacing an automotive condenser to plan for a complete swap.
Step 2: Choose DIY Car Air Conditioner Condenser Repair or Unit Replacement
Deciding whether to patch a condenser or replace it comes down to structural location and system operating conditions. Modern automotive AC systems operate under intense internal pressures—frequently swinging between 150 PSI and well over 300 PSI on hot days.
Option A: High-Temperature Epoxy Patch (Emergency/Budget Repair)
An epoxy patch (using reinforced metal-bonding agents like high-temp JB Weld rated for 250°F+ and high pressure) can work on isolated, accessible face-tube punctures caused by minor stone chips.
Clean the area thoroughly with non-chlorinated brake cleaner until all oil and grit vanish.
Abrade the bare aluminum around the puncture with a wire brush or rotary tool to give the epoxy a mechanical bite.
Mix the high-temperature epoxy, apply it firmly over the pinhole in a dome shape extending at least a half-inch around the damage, and allow a full 24-hour ambient cure.
Limitations: Epoxy will fail if applied over structural weld joints, near header pipes, on corroded metal, or over oily residue. It is a temporary fix rather than a permanent standard.
Option B: Unit Replacement (Recommended)
When dealing with split header tanks, damaged connection threads, salt corrosion, or internal blockages, replacing the assembly is the only sensible choice. Installing a fresh unit restores optimal heat dissipation and avoids repeat failures. For step-by-step mechanical removal protocols, check out proper AC condenser replacement procedures.
Step 3: Install, Pull Vacuum, and Complete System Recharge
Once you have secured a new condenser (or allowed your patch to cure fully), reinstall the assembly and prepare the sealed loop.
Mounting and O-Ring Replacement: Seat the condenser into its lower rubber mounting isolators. Discard all old green/purple rubber seals and install fresh, refrigerant-rated hydrogenated nitrile butadiene rubber (HNBR) O-rings coated in fresh PAG oil. Always use two wrenches—one on the line fitting and a backup wrench on the condenser block—to avoid twisting delicate aluminum hard lines.
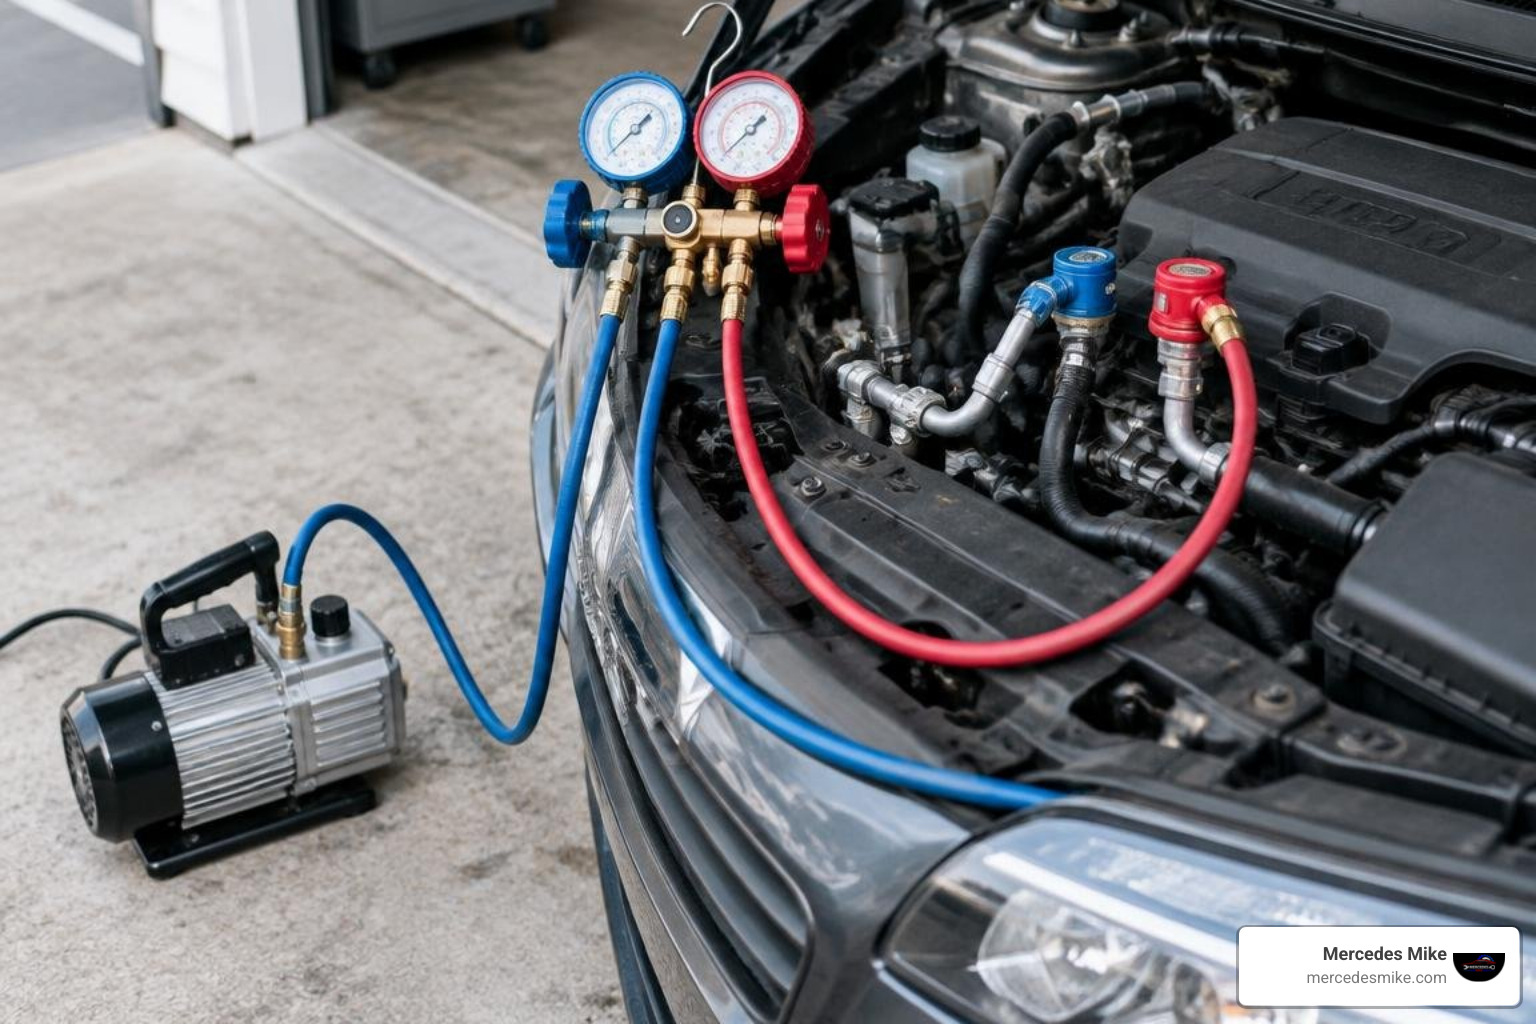
Deep Vacuum Evacuation: Connect the blue (low-side) and red (high-side) hoses from your manifold gauge set to the corresponding vehicle service ports. Connect the center yellow hose to your vacuum pump.
Boiling Out Moisture: Open both manifold valves and run the vacuum pump. Pull the system down to at least 29.9 inHg (below 500 microns if using a digital micron gauge) for 45 to 60 minutes. This drops the boiling point of internal moisture, boiling water out of the lines and drying the core.
Vacuum Decay Test: Close both manifold valves tightly and shut off the pump. Watch the gauges for 30 minutes. If the needle climbs toward zero, an active leak remains. If it holds vacuum solidly, the loop is tight.
Recharging by Weight: Connect a virgin refrigerant container (R-134a or R-1234yf) to the yellow utility hose, purge air from the line, open the low-side gauge valve, and charge the precise weight listed on your under-hood factory specification decal. Finish by confirming pressures with an air conditioning recharge protocol while running the engine at 1,500 RPM on maximum AC.
Cost Breakdown: Comparing Condenser Repair vs Replacement Expenses
Understanding the price landscape helps you budget effectively whether taking the DIY route or booking bay time with a professional technician.
Repair Method | Parts & Materials Cost | Labor / Equipment Cost | Total Estimated Cost | Durability & Reliability |
|---|---|---|---|---|
DIY Epoxy Patch | $15 – $30 (Epoxy, cleaner) | $50 – $100 (Refrigerant & dye) | $65 – $130 | Low (Temporary solution) |
DIY Condenser Swap (Aftermarket) | $100 – $200 (Condenser core) | $75 – $150 (Tool rental, O-rings, gas) | $175 – $350 | Moderate to High |
Professional Independent Repair | $150 – $350 (Quality OEM/OES) | $200 – $400 (3–4 hrs labor + recovery) | $350 – $750 | Very High (Warranty backed) |
Dealership Replacement (OEM) | $300 – $600 (Genuine unit) | $400 – $700 (Specialized diagnostics) | $700 – $1,300+ | Very High (Factory spec) |
For deeper context on vehicle-wide cooling expenses, review our car AC repair cost guide to see how various components compare.
Professional Car Air Conditioner Condenser Repair and Labor Pricing
When booking with an automotive repair facility, standard book times for condenser replacement run between 3 and 5 hours. The bulk of labor time involves carefully disassembling front grilles, bumper covers, and active shutter assemblies without breaking clips or misaligning safety sensors.
Addressing a failing condenser early protects your wallet from a much steeper bill. If a condenser leaks its charge, the compressor runs without adequate oil return. This friction quickly causes internal piston scoring and catastrophic lockup, creating a massive cost to fix an AC compressor that could easily have been avoided.
Component Upgrades: Replacing the Receiver-Drier and O-Rings
Whenever an air conditioning circuit is opened to ambient air, atmospheric moisture immediately contaminates the desiccant bag inside the receiver-drier or accumulator.
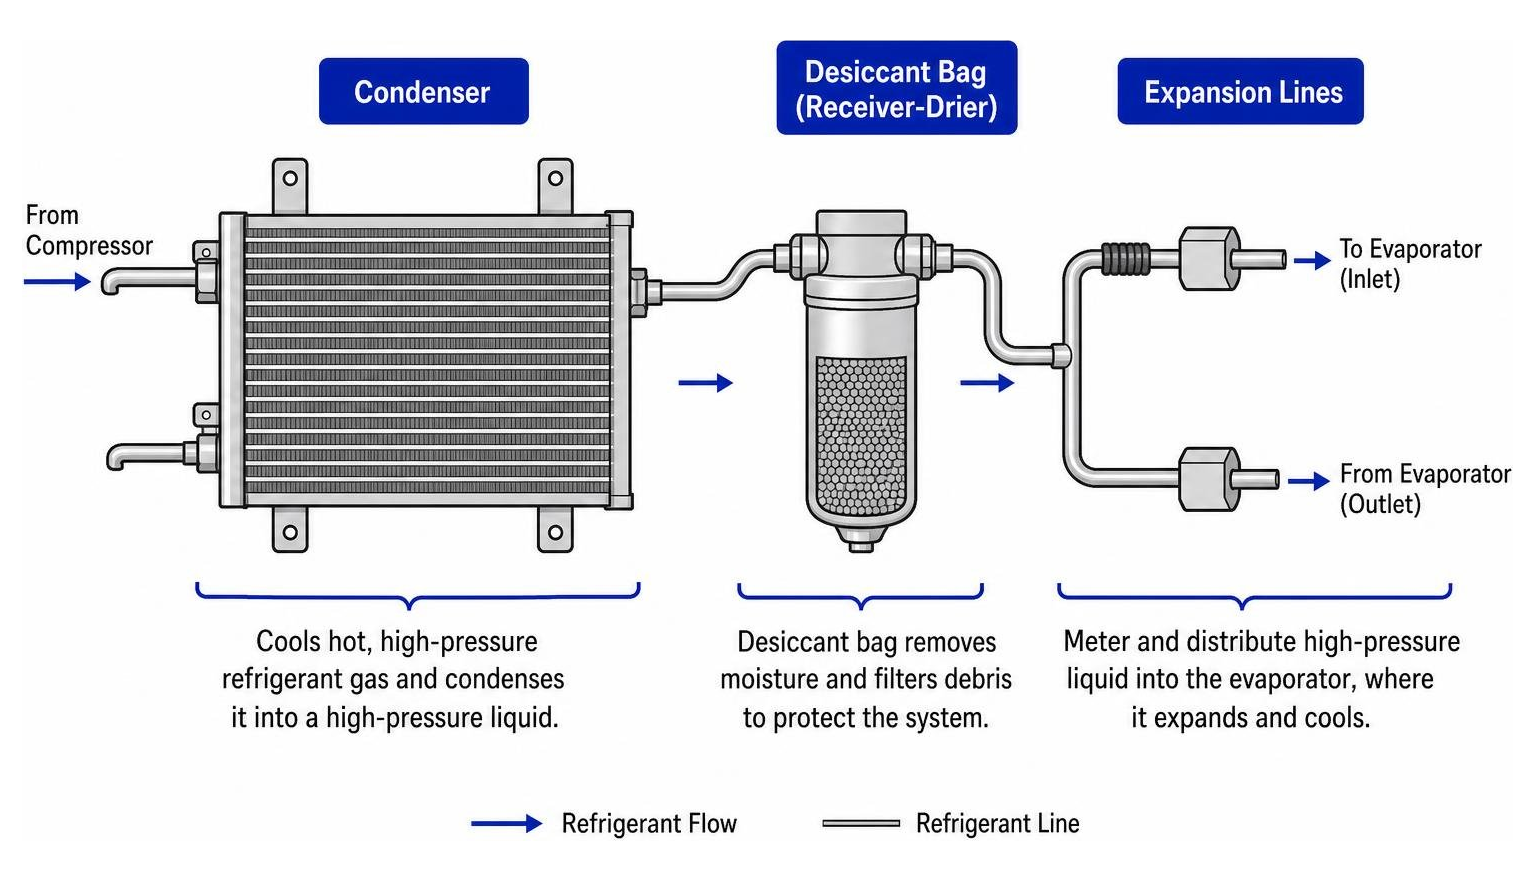
Leaving a saturated drier in a repaired system creates a recipe for internal corrosion. Ambient water mixes with circulating refrigerant chemistry to generate hydrofluoric and hydrochloric acids. These acidic compounds degrade metal lines and create black sludge—known in the automotive industry as "Black Death"—which clogs expansion valves and destroys compressor components.
Replacing the receiver-drier and all O-rings during condenser service is essential AC unit maintenance that protects your investment.
Frequently Asked Questions About Car AC Condenser Maintenance
Can you fix a car AC condenser with stop-leak sealant?
No, you should never use chemical stop-leak in a modern vehicle. Stop-leak additives react instantly with atmospheric moisture or oxygen. When circulating through micro-passages, the sealant gums up the thermal expansion valve, coats pressure sensors, and forms gummy plugs inside the condenser's micro-channel tubes. This often seizes the compressor, turning a simple repair into a multi-thousand-dollar nightmare.
How long does a car AC condenser repair or replacement take?
A professional technician with dedicated recovery gear and lift access generally finishes the job in 3 to 5 hours, including a deep 45-minute vacuum evacuation and precise recharge. For a beginner working at home, budget 4 to 8 hours to account for bumper cover removal, fin alignment, vacuum testing, and reassembly.
Do I need special certification to handle and recharge car refrigerant?
Under EPA Section 609, DIY vehicle owners are legally permitted to purchase small, self-sealing refrigerant cans (under 2 lbs) to service their personal vehicles. However, purchasing bulk cylinders (such as 25 lb or 30 lb tanks) or servicing vehicles for commercial compensation requires EPA Section 609 certification. Regardless of certification, venting refrigerant into the atmosphere is strictly illegal and subject to federal penalties.
Conclusion
Your car's AC condenser plays a critical role in vehicle comfort and cooling system health. By methodically diagnosing leaks with UV dye, deciding whether an epoxy patch or complete replacement makes sense, and following proper vacuum and recharging steps, you can restore ice-cold airflow while protecting expensive downstream components.
If your luxury vehicle needs precision diagnostics, leak testing, or a complete system overhaul, schedule an expert AC condenser repair with our experienced team to keep your cabin cool all year long.