Don't Lose Your Grip Over a Puddle of Power Steering Fluid
Identifying Symptoms and Pinpointing the Fluid Leak Source
To fix leaking power steering fluid, first pinpoint the leak location, then replace the compromised hose, seal, or pump, and finally bleed trapped air from the system. Start by checking the fluid reservoir and cleaning the suspected area with an automotive degreaser and shop rags. Then run the engine while an assistant slowly turns the steering wheel lock-to-lock to build system pressure and expose the source. For hard-to-find seeps, add an automotive-grade fluorescent UV dye to the reservoir, run the vehicle briefly, and inspect the fittings, pump shaft, and rack using a blacklight.
When a hydraulic steering system begins losing fluid, it rarely stays quiet about it. Power steering fluid acts as the hydraulic medium, lubricant, and coolant for the entire assembly. When pressure drops or air enters the lines, the system shows distinct mechanical symptoms:
Whining or groaning noises: A loud, high-pitched whine that increases in pitch as you turn the wheel is the classic sign of pump cavitation. This happens when air bubbles get drawn into the pump housing due to low fluid levels.
Heavy or erratic steering: You might feel sudden resistance when navigating low-speed turns or parking. Fluid pressure can drop by up to 30% before total assist failure occurs, giving you intermittent stiffness.
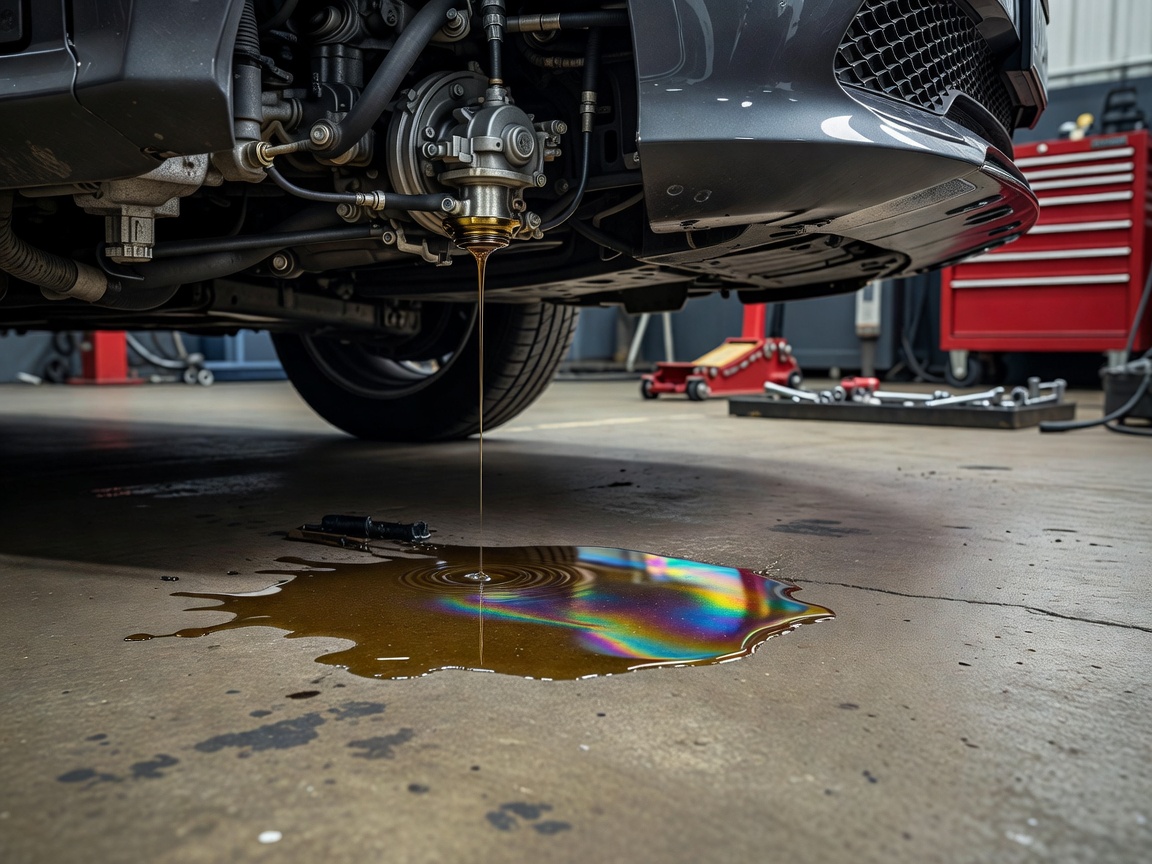
Puddles or spotting: Fresh fluid pooling near the front subframe, steering rack boots, or directly under the accessory drive belt area.
"Morning sickness": A condition where the steering feels extremely stiff when the car is cold but loosens up as the engine warms up, caused by fluid blowing past hardened, shrunken internal O-rings.
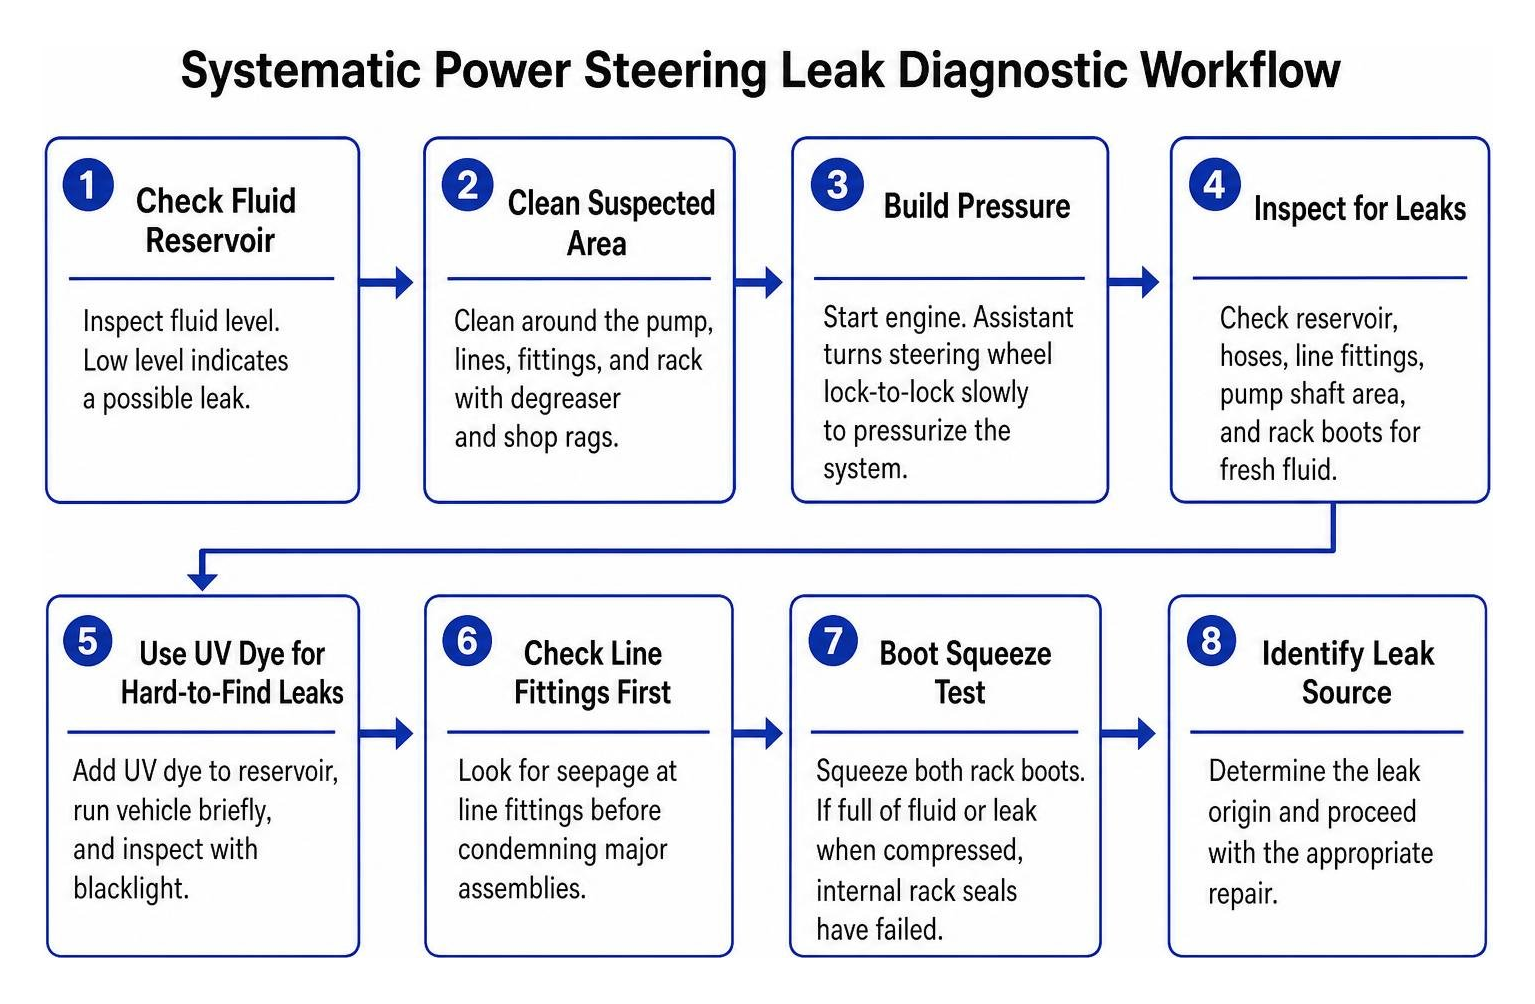
When reviewing diagnostic bulletins on diagnosing hydraulic line leaks, technicians always check for line fitting seepage before condemning major assemblies. If you also notice excessive wandering or loose handling while driving, you should investigate whether you need to fix play in steering wheel assemblies alongside repairing the leak.
Another crucial check is the Boot Squeeze Test. The rubber accordion bellows at each end of the steering rack are designed solely as dust shields for the inner tie rods—they are not meant to hold pressurized fluid. Squeeze both rubber bellows by hand. If they feel full of liquid like a water balloon or leak fluid when compressed, the internal high-pressure rack seals have failed, trapping fluid inside the boot.
Differentiating Hydraulic Leaks from Electric Power Steering Issues
Before wrenching on lines or buying hydraulic fluid, confirm what kind of power steering your vehicle actually uses. Modern vehicles generally use one of two setups:
Hydraulic Power Steering (HPS / Electro-Hydraulic): Uses a belt-driven or electric pump, a fluid reservoir with a steering wheel icon, hydraulic lines, and a fluid-filled steering rack or gearbox.
Electric Power Steering (EPS): Uses an electric motor mounted directly to the steering column or rack, managed by torque sensors and an electronic control unit (ECU).
EPS setups have zero hydraulic fluid, no pump, and no hoses. If an EPS-equipped vehicle has steering issues, you will see a dashboard warning light (such as an illuminated steering wheel icon or EPS error) rather than a puddle on your driveway. If your vehicle uses an electric assist motor and suffers from mechanical binding or electrical faults, you can evaluate the cost differences in electric power steering repairs versus traditional hydraulic systems.
Common Leak Locations: Pumps, Lines, and Steering Racks
Hydraulic fluid operates under pressures ranging from 1,000 to over 1,800 PSI on the high-pressure side. Over years of thermal cycling, vibration, and road debris, several key components are prone to developing leaks:
Pump Shaft Seals: Located directly behind the drive pulley. When this front seal hardens or the internal bushing wears out, fluid escapes and gets slung around the engine bay by the spinning pulley.
High-Pressure Hose Fittings: High-pressure lines use crimped metal-to-rubber connections. The rubber sections degrade from engine heat, leading to weeping at the crimp sleeves or leaking flare connections.
Low-Pressure Return Lines & Reservoir: Low-pressure return hoses clamp onto the reservoir and cooler lines. Plastic reservoirs can also crack near the mounting tabs or bottom outlet barbs due to continuous heat cycles.
Steering Rack End Seals and Pinion Seals: Internal seals contain fluid inside the rack cylinder. When road grime breaches the tie-rod boots or the seals wear out, fluid pushes past the rack shaft and collects inside the boots.
Rack Transfer Tubes: External steel or aluminum hydraulic lines that route pressurized fluid between the left and right cylinder chambers can corrode or crack. When these external metal lines fail, a targeted rack and pinion transfer tube replacement can resolve the leak without requiring an entire steering gear assembly.
Temporary Fixes vs. Mechanical Repairs for Power Steering Leaks
When fluid is dripping, vehicle owners often consider chemical stop-leak additives. These chemical treatments use petroleum fractions, seal-swelling agents, and synthetic friction modifiers designed to soften and expand hardened, shrunken nitrile or viton rubber O-rings.
Chemical seal conditioners can work well as an interim measure for minor, slow seepage caused by aging O-rings that have lost their elasticity. However, chemical additives cannot fix physical damage. If a seal is torn, gouged, or blown out from excessive pressure, liquid additives will wash right past the gap.
Repair Option | Best For | Typical Lifespan | Pros | Cons / Limitations |
|---|---|---|---|---|
Stop-Leak Additive | Minor O-ring shrinkage, low-rate seepage | 3–12 months (temporary) | Inexpensive ($10–$30), easy to pour into reservoir | Cannot fix split hoses, metal cracks, or torn seals; risks gummy residue |
Hose / Line Replacement | Weeping crimps, cracked rubber, rusted hardlines | 5–10+ years | Eliminates high-pressure blowouts; fully restores line integrity | Requires line bleeding; flare fittings can be stubborn to remove |
Pump / Rack Seal Rebuild | Leaking shaft seals, end seals on undamaged shafts | 5–8 years | Low parts cost ($40–$100 kit) | Highly labor-intensive; requires specialized seal drivers and bench vise |
Component Replacement | Heavily worn pumps, scored rack shafts, cracked housings | Vehicle lifespan | Complete reliability; solves mechanical wear and internal valving issues | Higher parts cost; requires subframe or accessory drive disassembly |
When Chemical Sealants Fail to Fix Leaking Power Steering Fluid
Chemical stop-leak additives have hard physical limits. Knowing when chemical treatments are useless will save you time and prevent secondary damage to your steering system:
Structural Hose Tears: High-pressure lines operate under extreme pressure. A pinhole leak or separated crimp will burst regardless of how many additives you pour into the reservoir.
Scored Shafts: If road grit gets past a torn boot and scores the polished chrome plating on the steering rack or pump shaft, a fresh seal cannot mate against the grooved metal surface.
Internal Valve Clogging: Thickening additives or products containing solid particulates can clog the spool valve passages inside the steering rack, causing heavy, unpredictable steering assist.
When you need to properly fix leaking power steering fluid caused by damaged mechanical parts, replacing the compromised seal, hose, or assembly is the only permanent, reliable path forward.
How to Fix Leaking Power Steering Fluid: Step-by-Step Repair Methods
Replacing a leaking power steering component requires methodical mechanical work, proper torque specifications, and thorough bleeding to remove all trapped air.
Tools and Materials Required to Fix Leaking Power Steering Fluid
Before starting the repair, gather the following tools and supplies:
Metric combination wrench set and 3/8-inch drive socket set
Flare nut (line) wrenches (essential for high-pressure line fittings to prevent rounding off soft brass/aluminum nuts)
Power steering pulley puller and installer tool set (for press-fit pulleys)
Catch pan, shop towels, and automotive degreaser
Fluid transfer syringe or suction gun
Vehicle jack, heavy-duty jack stands, and wheel chocks
Snap-ring pliers and seal pick set (if rebuilding internal seals)
Manufacturer-specified power steering fluid (OEM Pentosin, ATF, or mineral base as required)
New O-rings, copper crush washers, and replacement hardware
Power Steering Pump and Pressure Hose Replacement
Elevate and Secure the Vehicle: Park on level ground, apply the parking brake, and raise the front of the vehicle with a hydraulic jack. Secure the frame on jack stands and chock the rear wheels.
Drain the Reservoir: Use a fluid suction gun to evacuate old fluid from the reservoir into your catch pan. Place rags beneath the pump to catch residual spills.
Relieve Serpentine Belt Tension: Locate the drive belt tensioner. Rotate the tensioner pulley using a breaker bar or long wrench to take tension off the serpentine belt, then slide the belt off the power steering pump pulley.
Disconnect Hydraulic Lines: Using a flare nut wrench, break loose the high-pressure line fitting at the pump outlet. Disconnect the low-pressure return hose by releasing its spring or screw clamp. Allow lines to drain into the pan.
Unbolt and Remove Pump: Remove the pump mounting bolts passing through the pulley cutouts into the engine bracket. Carefully lift the pump assembly out of the engine bay. If reusing your pulley on a new pump, use your pulley puller tool to press the pulley off the old shaft and install it onto the replacement unit.
Install New Pump and Lines: Bolt the new pump into position, torque mounting bolts to factory specifications (typically 18–25 lb-ft). Replace all sealing O-rings and crush washers on the pressure line fitting. Thread line fittings by hand first to prevent cross-threading, then tighten securely with your flare wrench.
Refill and Bleed: Fill the reservoir with fresh, OEM-specified fluid. With the front wheels elevated and engine off, rotate the steering wheel smoothly from full left lock to full right lock 15–20 times. This pushes trapped air bubbles out of the rack and up through the reservoir without aerating the fluid under pump pressure. Lower the car, start the engine, check for leaks, and verify smooth, silent steering.
For vehicles utilizing an integrated steering gearbox rather than a rack, completing a dedicated power steering box repair follows a similar process of line evacuation, pitman arm puller removal, and input shaft seal rebuilding.
Steering Rack Seal and Transfer Tube Rebuilding
Rebuilding a leaking rack involves bench-level disassembly:
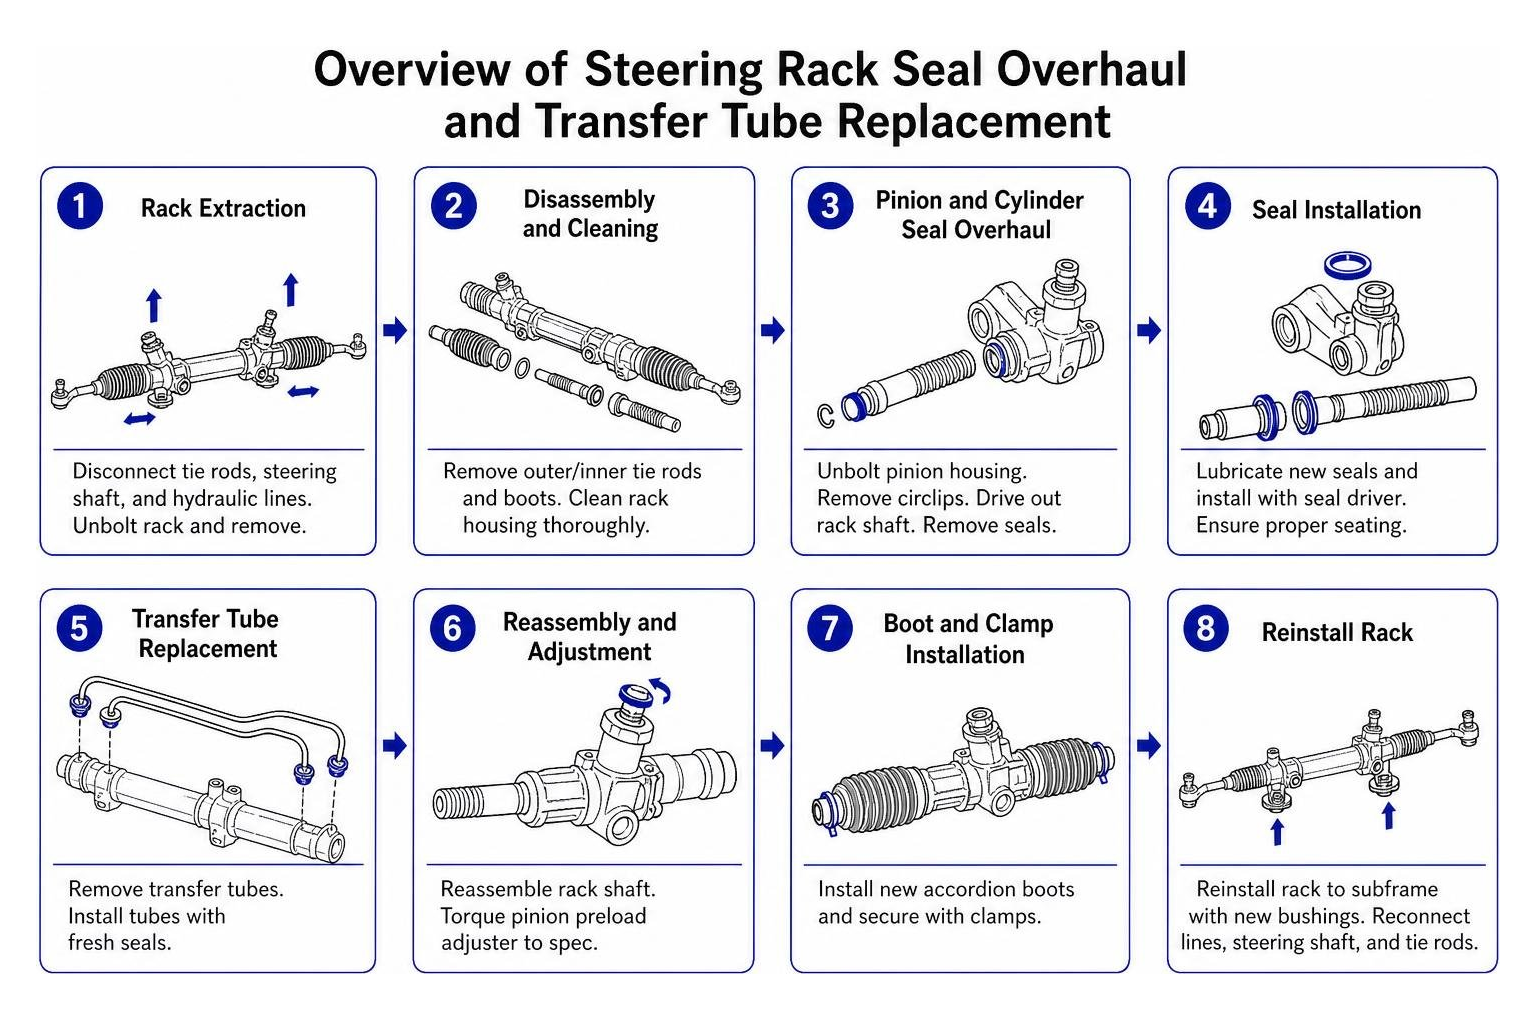
Rack Extraction: Disconnect outer tie rods from the steering knuckles using a ball joint separator. Uncouple the steering column intermediate shaft pinch bolt. Disconnect hydraulic lines and unbolt the rack mounting bushings from the subframe, sliding the entire rack assembly out of the vehicle.
Disassembly and Cleaning: Mount the rack in a soft-jaw bench vise. Remove the outer tie rods, inner tie rods, and accordion boots. Clean all road dirt and debris from the exterior housing.
Pinion and Cylinder Seal Overhaul: Unbolt the pinion housing to access the rotary valve assembly. Extract internal circlips with snap-ring pliers, then drive the main rack shaft out of the cylinder housing. Use a seal pick to pull the inner cylinder bulkhead seal and pinion shaft seals.
Seal Installation: Lubricate new Viton O-rings and Teflon slide rings with clean power steering fluid before seating them with a seal driver. Reassemble the rack shaft, torque the pinion preload adjuster to spec to eliminate internal backlash, reinstall transfer tubes with fresh seals, and clamp new dust boots in place. When dealing with widespread steering issues, executing a comprehensive steering repair ensures all tie rods, bushings, and hydraulic seals are restored together.
Repair Costs and Labor: DIY Rebuild vs. Professional Service
Repairing a leaking power steering system involves distinct tradeoffs between component parts costs and heavy labor investments. A DIY seal kit is inexpensive, but replacing internal rack seals requires specialized tools and mechanical experience.
Component / Task | DIY Parts Cost Range | Professional Repair (Parts + Labor) | Average Labor Time |
|---|---|---|---|
Return Hose Replacement | $25 – $60 | $120 – $280 | 1 – 1.5 Hours |
Pressure Hose Replacement | $50 – $140 | $220 – $500 | 1.5 – 2.5 Hours |
Power Steering Pump | $120 – $350 | $350 – $850 | 2 – 3 Hours |
Reservoir & Filter Assembly | $30 – $90 | $120 – $300 | 1 Hour |
Steering Rack Seal Kit (DIY) | $40 – $100 | N/A (Shops replace assembly) | 4 – 8 Hours |
Full Steering Rack Replacement | $350 – $700 (Part only) | $800 – $1,800+ | 4 – 6 Hours + Alignment |
When budgeting for a full steering rack replacement, professional shops typically charge a refundable core deposit ($100–$300) on remanufactured racks, and every rack replacement requires a mandatory four-wheel alignment ($100–$180) once reinstalled.
Preventive Maintenance to Avoid Future Steering Leaks
Simple preventive habits will help you avoid premature seal failure and expensive hydraulic repairs:
Follow Fluid Inspection Intervals: Check your reservoir fluid level every 10,000 miles or during routine oil changes. Clean around the reservoir cap before unscrewing it to prevent road grit from falling into the fluid.
Use the Exact OEM Fluid Spec: Never treat power steering fluid as a universal product. Modern German and domestic vehicles have tight internal tolerances requiring specific mineral-base or full-synthetic fluids (such as Pentosin CHF 11S / 202) or specific Dexron ATF formulations. Using incorrect fluid causes rubber seal swelling, softening, and premature failure.
Perform Fluid Flushes Every 50,000–60,000 Miles: Over time, hydraulic fluid shears down, loses its anti-wear additives, and accumulates micro-abrasive metallic particulates that wear out shaft seals.
Avoid Holding the Wheel at Full Lock: Holding your steering wheel hard against the steering stops forces the pump’s internal pressure relief valve to bypass continuously, spiking fluid temperatures above 250°F (120°C) and accelerating seal degradation.
Maintain Proper Belt Tension: An over-tightened serpentine belt puts excessive radial load on the pump shaft bearing, leading to premature shaft seal leakage.
Frequently Asked Questions About Power Steering Leaks
Is it safe to drive with a power steering fluid leak?
Driving with an active leak is risky. If the fluid level drops too low, the pump will cavitate, overheat, and suffer severe internal damage within a few miles. Furthermore, losing hydraulic assist mid-turn makes the steering wheel heavy and difficult to turn, creating a serious hazard. Pressurized fluid spraying onto hot exhaust manifolds also creates a severe fire risk.
What color is power steering fluid when it leaks?
Fresh fluid color depends on the formulation:
Red or Pink: Automatic Transmission Fluid (ATF), common in many domestic and Asian vehicles.
Clear to Amber: Universal petroleum-based hydraulic fluid.
Dark Green or Blue-Green: Synthetic mineral hydraulic fluids (e.g., Pentosin CHF specifications common in German vehicles).
Dark Brown or Black: Severely oxidized, overheated fluid that has picked up wear debris and needs replacement.
How long does a power steering rack replacement take?
For a professional technician with a vehicle lift and subframe support gear, a steering rack replacement takes 3 to 5 hours, plus time for a wheel alignment. For a DIYer working on jack stands, the job typically takes 4 to 8 hours, as subframe clearance, exhaust piping, and stubborn hydraulic line fittings can add significant time to the repair.
Conclusion
Hydraulic power steering gives you precise, effortless road control—until a leaking seal or cracked line drops system pressure and leaves a mess on your driveway. Catching leaks early saves your power steering pump from catastrophic cavitation damage and keeps your vehicle safe on the road.
If you are dealing with persistent power steering leaks, pump whining, or heavy steering in South Florida, let our experienced team help. At Mercedes Mike, our technicians use professional diagnostic tools and OEM components to restore your steering system to factory specifications. Schedule professional steering service with us today to keep your car driving smoothly and safely.